 In the past few years I've found the best way to maximize the amount of enjoyment I gain from a backpacking trip is to spend time before the trip researching, mapping, and planning. Then, upon my return home I opt to spend time cataloging, memorializing, and sharing the trip through my Web site, a photo-sharing site, and a trip-sharing site.
 This is the first of a two-part blog series in which I will discuss my pre and post trip processes. If you find all of this silly and would prefer to read only about activities during a backpacking trip, feel free to explore this site as I have dozens of trips cataloged herein.
Part One: Planning and Research
My research and trip planning involves a multi-pronged approach, but the most time is spent poring over maps, both paper and digital. I generally start the process using a large-scale area map to hone into the particular mountain range, drainage, or zone that I'd like to explore. After that has been determined I scale down the area of precision using my computer.
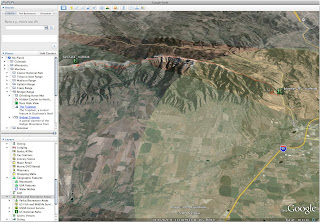 I primarily use the Google Earth software with a free USGS topographic map overlay installed. Once I've zoomed in on the area I determined to explore I use a series of Google Earths tools to map out my route and points of interest. I first make the USGS topo layer visible so that I can see any trails or other man-made features that are present in the area I want to explore. I next trace my chosen route into a new Earth layer using the "Add Path" tool. I turn the topo layer on and off to see how my route looks on the satellite image as well as on the map image. Next I use the Google Earth "Add Placemark" tool to mark the location of trailheads, possible campsites, or other locations of note along my route.
 Within the Google Earth software I organize my routes within a folder structure. I have a folder for each of the states in which I've done trips. Within the folder for the particular state are sub-folders that are based on areas, whether that be a mountain range, a long trail, or a park. For instance in my folder entitled Montana there are sub-folders for the Bridger Mountains, Yellowstone, and Continental Divide Trail. Within the sub-folder there is yet again another series of folders - one for each trip. If I opt to hike a route twice but do it slightly different I may make a new folder that has information specific to it.
Google Earth is a great way to look at a trail from various points of view. You can see your route from above as if looking at a map or you can see it from a birds eye view at an angle from the sky, and you can even maneuver yourself along the trail at ground level to get a feel for how the terrain feels before you get there.
Part One: Data and Analytics
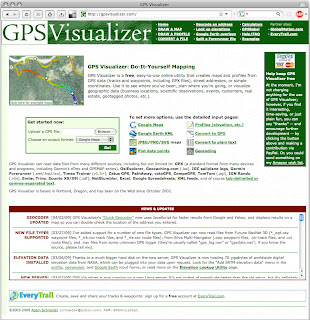 I'm an analytical person as well as a spatial person and maps aren't enough information in my thirst for data. For this reason I like to extrapolate specific mileage and elevation data from the mapped information. This is where a very useful Web site, GPSvisualizer.com comes in handy. There are a multitude of functions that this online software can perform but I find a handful of them most useful.
 The first step in turning the pretty little map I've created into rows and columns of data is to export a .kml file of my route from Google Earth. This is done by selecting the trip folder, right-clicking on it, and selecting "Save Place As". This will save all your path and placemark information in the .kml file format. The .kml file can then be turned into a number of other file formats using GPSVisualizer.
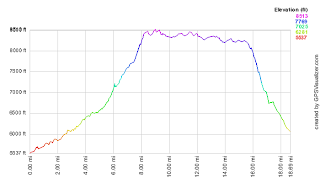
Using the "Convert a File" link at GPSVisualizer I am able to create a spreadsheet that contains mileage data. This information can then be entered into the form at the "Look up Elevation" link. A third step allows me to create a section profile of the entire route. A section profile is graphical analysis of the route depicting mileage and elevation information.
Part One: Conclusion
To summarize, in this post I've discussed the use of paper maps, Google Earth software, and the GPSVisualizer.com Web site to research and view potential trip routes. I have a number of routes that I've prepared, but not yet hiked. These provide a fun way to dream of places to go in the backcountry.
Stay tuned for the next installment in which I impart wisdom of how I go about sharing a trip with friends, family, and other onlookers whom may be interested in that trip themselves or just interested in what I'm doing after I've returned home. Some of the tools I use for that are my Web site, Flickr.com, and EveryTrail.com. But that's enough of a sneak peek - - until next time, happy hiking.

Thanks Sam. I will study and save this. Looking forward to future installments.
ReplyDeleteTomS
Thanks Sam. I look forward to Part 2 as I definitely could use help in this arena and others. Keep up the good work. Thanks.
ReplyDeleteLoads of good info and plenty to keep me busy, thanks for posting this Sam.
ReplyDeleteThanks for the comments. I need to get my act together and write up part II soon.
ReplyDeleteSam, do you use the free version of Google Earth?
ReplyDeleteHoldfast, I do use the free version. I've had the chance to use the Pro version as well. The Pro version apparently has higher-resolution imagery but I'm perfectly content with the free one.
ReplyDeleteThe level of resolution is certainly a lot lower in some parts of Norway because I'm having trouble making out a lot of paths!
ReplyDeleteWith the 'add path' function are you able to actually 'draw' your intended route? All I seem to be able to do in 'add path' is add placemarks.
Once you click the "add path" button the cursor will turn into a set of cross hairs. Clicking the mouse button will add a point to the map, clicking again will add another point and draw a line between the two, clicking again will add a third point and line, and so on and so forth.
ReplyDeleteThanks Sam, after an hour or so playing around with it I've managed to build a very useful route tool for an upcoming trip. Thanks for taking the time to point me in the right direction.
ReplyDeleteI'm glad you found my advice helpful!
ReplyDeleteGreat advice. Thanks. I just found your blog and really enjoyed reading your post.
ReplyDelete